All the anxiety and anticipation I have had over the last 6 months has paid off ! I am more pleased with the end results than I ever expected things to be. I have learned so much from all the wonderful bloggers out there in the blog world. So I have to thank so many of you just from your inspiring ideas. Many of you have redone your own Sewing & Craft rooms or corners you could find in your home, and shared your pictures and ideas of how you accomplished them.
Like many of you, I too am a thrifty shopper as well as inspired more by finding pieces at thrift stores or garage sales. I hope I can inspire other's in the same way that you all have inspired me. I have only dreamed of having a room solely for my use in sewing and other crafts I have learned, which by the way is jewelry making. Finally after our children have moved on with their own lives, my husband & I are now empty nester's.
I have used one of our 3 bedrooms in our small home for a sewing room, but it was put together with a mix of furniture and storage units to just make it work. Also over the years we have tried to maintain our home with 3 children on a budget and really never put much money into our home. So now it's our turn.
From previous blog entries, I mentioned to all of you my husband has been off work, taking care of some serious joint issues he has had for over 5 years. We started 7 months ago with his first surgery of his right knee having a total replacement. That was more than I ever even imagined in all the rehabilitation that was involved. He has had to endure an enormous amount of pain beyond what most people should have to endure.
He has endured his left knee replacement, and now finished with a complete left hip replacement. But through it all, we have drawn closer together and had more time together than most people our age. We have always been best friends and very close, so drawing closer was a nice surprise for both of us as this year marks our 40 years together !! How many people can say that ?
Enough of all that mush, on with the "REVEAL"...
While my husband has been home, he has been able to see with new eyes, how our home has really needed more of an uplift than paint can handle. One of the things he had in mind was to really design my sewing room to make it not only more functional, but professional. Since I do dressmaking and alterations for clients, I really needed to make it more of an inviting room to bring them into.
After alot of thought we came up with a design that fit perfectly. The room is only
10 X 11, so we had to make sure it utilized all the space to the best advantage possible. I can say it all turned out perfectly. In February I posted my sewing room prior to the makeover, titled "Time to Update". So let me show you the finished results.
 Directly across from my sewing work station is my new cutting work station, put together by two units of storage with a cutting top installed. It was raised about 5 inches taller than the sew work station, making it perfect standing up. I put a ribbon & fabric tack board on the wall to accomodate pictures and patterns I am currently working on. I have 5 drawers of storage along with a cupboard for odd storage, perfectly accomodating my embroidery attachment arm that is quite awkward. Next to the cutting work area is my new mannequin "MOLLY" to model any of my current garment projects along with matching jewelry designs.
  |
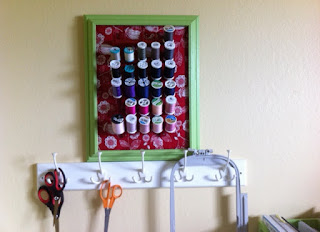
Between the two work stations on the wall is my new design for holding thread. I must proudly say after explaining to my husband my idea, his idea was even better. These thread holders we put together really make the room. They turned out to be incredible. All we did was upon finding just the right picture frames at our local thrift store, I painted them, attached fabric and batting to the MDF backboard, then nailed the thread holders to the MDF. I spray painted the thread holders, as they are the usual pine color at the local fabric shop when you purchase them and they usually are sitting on your sew work area, taking up space or mounted on the wall. But I wanted something more asthetic looking, and I think we did an awesome job, here's the other two I did, so let me know what you think. Do they fit the new room design?
I had to think before all the things were done, as my husband said, to even take into consideration small storage. We utilized all the empty spaces we could see and used them to our advantage in making room for sewing accessories and smaller sewing tools. Below the cutting station, behind the drawers, my son built in small shelves to store my Steam Iron, along with other open fabric storage totes. On the floor is my apothecary box that stores perfectly by the way, all my tapes of binding and buttons.
Right next to it, on the backside of the sew station, is small storage shelves that my son put together to store all my serger threads. We all know how difficult that can be to store all of them bulky type items. Either lots of plastic containers or just thrown into drawers... but I wanted something not only different, but more functional.
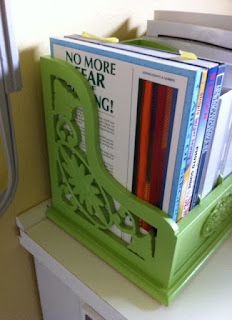
Another challenge all of us have is where to store our reference books. Again we can just stick them on top of our work space, just throw them into drawers, or take up space on our shelves. I just love my local thrift store, as I never know what I will find, but when I do, instantly I know I have found just what I need. One of my last visit's to the store to see if I could find something for ribbon storage, I came across this adorable book storage that appears to have been either for a cute desk or kitchen counter. It was white, so I painted it to fit into my color scheme. Let me know what you think.
Don't they go great with my apple green drafting chair I found online. At first we thought it would not be very comfortable, but it is. Best of all, because it was not a color that's really in demand, it was a clearance item on the web, and a steal for $30, $170 off regular price.
I mentioned before about even the small storage solutions. Ribbons seem to take over work space, as you need them to customize a project. But how and where to store them can sometimes seem overwhelming, especially when trying to maintain a professional looking work zone. Since my daughter-in-law assisted me with my lovely jar for ribbons, as with everyone, I have tons of ribbon, and many of them are loose. So after analyzing and looking many times at some of fellow blogger's sites, I came up with my own solution to fit my work area.
I just love how they look, they add such a colorful touch to the workspace.
I hope you enjoy my makeover, so please post any comments as well as feedback. I have learned so much from many of you, and hope as I continue with this endeavor of sharing what I do will inspire and help others as much.
Thank you so much, all of you. But most of all, to my Husband/Boyfriend of 40 years this year for his design and endeavor to make this all possible for me. To my Son, the carpenter, who worked so hard to meet all my requests. To all my friends who put up with all my mess over the last few months as we not only redesigned my sewing room, but also in the same span of time emptied our house to strip carpet and refinish all our floors in the house.


You did a fabulous job! I like how functional everything is. I redid my space but it's only a temporary space as I'm using my son's room who will be home in December after being gone for two years. Then I get to redo my daughter's room and make it my own since she'll be moving out and going to college. I'm excited to take on that challenge and your space gave me some fun ideas!
ReplyDeleteCindy
Hello! I found you at the linky party on Sew Many Ways... you are a very lucky lady! Love your craft room makeover... I will have to refer to this when I get around to organizing mine! :) We recently moved into a new (well, new-to-us!) home and I get the smallest bedroom for my craft room (YAY!!!)... right now it is just a clutter collect-all though, so I have a lot of cleaning to do before I can begin the room's makeover! :) Wish me luck!!!
ReplyDeleteThanks for auditioning for American Crafter- good luck:)
ReplyDeleteLove the thread holder! What a great idea!
ReplyDeleteGreat job! It must feel sooo good to have a clean, uncluttered, pretty space to work in. Hopefully I'll get there some day. :) I'm a bit envious of you right now!!
ReplyDeleteLooks great! Totally jealous!
ReplyDeleteWould love for you to share at Calling All Crafters!
http://allthingsfee.blogspot.com/2011/05/calling-all-crafters-5th-edition.html
Where do I begin??!! I LOVE everything about this space! What you did with those boring old thread holders is wonderful! The clear ribbon storage is fantastic -- why not enjoy all of the beautiful colors and patterns WHILE they're stored?! Great job all the way around!
ReplyDeleteFound you through your comment on Gertie's sewing room makeover post and just had to say that I *adore* your ribbon storage idea! Are they vases? They're gorgeous! (Also, love your color scheme and the thread holders are fab!)
ReplyDelete